Home Assistant
Power Manifold connects to Home Assistant through an MQTT broker. Once connected, it appears as one device with every port and setting. No YAML configuration is required.
Connect it
Section titled “Connect it”-
Have an MQTT broker. If you don’t have one, install the Mosquitto broker add-on in Home Assistant, then add the MQTT integration. Create a Home Assistant user for Power Manifold to log in with.
-
Point Power Manifold at it. In the web interface’s Settings, fill in the MQTT broker (your Home Assistant’s address), the port (usually 1883) and the user and password. Press Save, then Reboot.
-
Find the device. In Home Assistant, go to Settings → Devices & services → MQTT. Power Manifold appears as a device named after it.
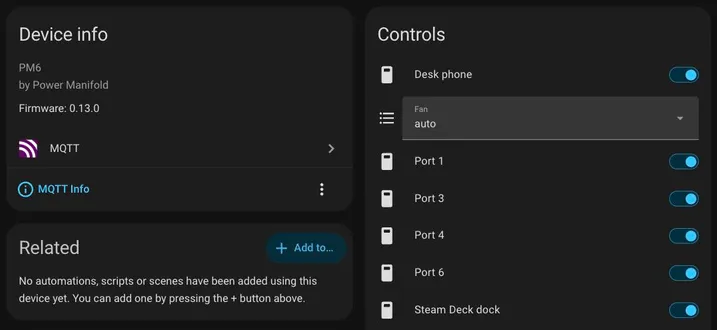
If you use more than one Power Manifold, give each a different device name before connecting it.
To encrypt the connection to the broker, see MQTT security.
What you get
Section titled “What you get”For each port
Section titled “For each port”Entities are named after the port, so renaming a port renames them. Their entity IDs don’t change.
| Entity | What it does |
|---|---|
| Switch | Turns the port on or off. |
| Power, voltage, current | Live readings, once a second. |
| Energy | Energy delivered since the controller started. Works with the Energy dashboard. |
| State | idle, active, throttled, fault and so on. Its attributes include the most recent fault and when it happened. |
| Charging | On while a device is plugged in and still charging. |
| Converter temperature, plug temperature | Blade temperatures. They read unknown while the port is off. |
| Priority, current limit, voltage cap, power-up state, switch off when charged, sleep timer | The port settings. |
| Hard reset | Briefly cuts the port so the device starts its connection over. |
| Re-announce | Sends the device the port’s offer again. |
| Events | Fires on plug-in, unplug, charged, faults and more. See below. |
For the whole chassis
Section titled “For the whole chassis”| Entity | What it does |
|---|---|
| Total power, budget headroom, total energy | How much is being used and how much room is left. |
| Power budget | The chassis budget. |
| Fan | auto, on or off. |
| LED brightness | Port light brightness. |
| Charged below, charged after | When a device counts as charged. |
| Problem | On when something needs attention. Its detail attribute says what. |
| Bus voltage | The input voltage from your power supply. |
| Open BLE provisioning | Opens Bluetooth for ten minutes to change Wi-Fi. |
| Firmware update | Shows when a new release is out. Press Install to update. See Updates. |
| UPS sensors | Only with a UPS power supply connected, which is unofficial. |
Automations
Section titled “Automations”Each port has an events entity for use as an automation trigger. Its event types are:
| Event | When |
|---|---|
attached / detached |
A device is plugged in or unplugged. |
charged / charging |
A device finished charging, or started again. |
enabled / disabled |
The port was switched on or off. |
auto_off |
Switch off once charged or the sleep timer turned the port off. |
throttled / restored |
The port was turned down for the budget, or got its power back. |
fault |
The port shut itself off. The text attribute says why. |
inserted / removed / ready |
The controller found a port, lost contact with it, or the port finished starting up. |
contract |
The device switched to a different voltage or current. |
probe_failed |
A blade didn’t respond while starting up. |
updated |
The blade’s firmware was updated. |
Example: get a notification when a port faults.
triggers: - trigger: state entity_id: event.desk_phone_events not_from: unavailableconditions: - condition: state entity_id: event.desk_phone_events attribute: event_type state: faultactions: - action: notify.notify data: message: "Desk phone port: {{ trigger.to_state.attributes.text }}"Example: power-cycle an unresponsive Raspberry Pi by turning its port’s switch off, waiting ten seconds, and turning it back on. This uses the port’s Switch entity, so a script or a dashboard button can do it.